Monday, March 25, 2013

Farro with Roasted Squash, Hazelnuts, Watercress & Goat Cheese


Farro with Roasted Squash, Hazelnuts, Watercress & Goat Cheese
Farro is literally the first grain – the grain from which all grains descended. Tritucum dicoccum has been growing in the Mediterranean for thousands of years. For the last few hundred years, farro has been a mainstay of Tuscany. It plays very well with other fruits of the earth like legumes and leafy vegetables. Since the outer husk adheres to the grain, the fiber, magnesium and vitamin A, B, C and E content is very high.

It is not a wheat, but a plant and grain all its own with low gluten content. It has a complex, nutty taste with undertones of oats and barley. Because farro contains a starch similar to that found in Arborio rice, it behaves like risotto, releasing a creamy, binding liquid when cooked. But unlike risotto, farro does not become gummy; instead, it retains its tender, distinct bite, even if it sits awhile after cooking.
Semi-pearled farro
Farro is sold whole, semi-pearled or pearled, all of which can be used interchangeably. Pearling removes the inedible hull that surrounds the grain, but the process also scours off part (semi-pearled) or all (pearled) of the nutritious germ and bran. Whole farro is difficult to find in the US. The food world has really been buzzing lately about farro; its health properties, its wonderful flavor, its texture. While the pearled is easier and quicker to cook, the nutrients vanish with the husk, along with a good bit of the flavor. Hence, we much prefer the compromising semi-pearled farro. 
  • 2 C Farro, rinsed – semi-pearled preferred
  • 2 med. butternut squash, cut into ½-inch cubes (about 3 lbs.)
  • 12 C apple cider (divided)
  • 4 C water
  • ½ C & 3Tb Extra-virgin olive oil (divided)
  • ¼ C balsamic vinegar
  • ¼ C hazelnuts, toasted
  • 2 C cleaned watercress, rinsed & dried
  • 8 oz goat cheese
  • 1 Tb butter
  • Kosher salt
  • Freshly ground pepper

Soak the semi-pearled farro 30-60 minutes covered amply by cold water. If using whole farro, soak overnight. Pearled farro requires no soaking.

To make the vinaigrette, put 8 C apple cider in a saucepan at med-high heat and reduce down to 1 C. Off heat, add ¼ C balsamic vinegar and whisk together. While continuing whisking, drizzle in ½ C olive oil to emulsify. The resulting vinaigrette should be smooth and slightly thick. Set aside.
Stirring the vinaigrette (in sepia tones!) 
Start out with 4 C of apple cider and 4 C water. Add pre-soaked drained farro and season the liquid lightly with salt. Bring farro to a boil from cold and cook at a steady simmer for 30-40 minutes until it is slightly al dente. Cooking times will vary depending on the age of the semi-pearled farro. If using pearled farro, you can expect to cook in half the time. Taste often as it is cooking, you want it to be toothsome and retain structure. Drain and add to a large bowl. Add ¼ C of the vinaigrette to the warm cooked farro and mix thoroughly.

Cooked farro
While the farro is cooking, preheat oven to 450 degree F. Mix cut butternut squash with 1 Tb olive oil. Place squash in a single layer on a sheet pan and into the preheated oven for approximately 15 minutes. Set aside. You will want the squash soft and browned.
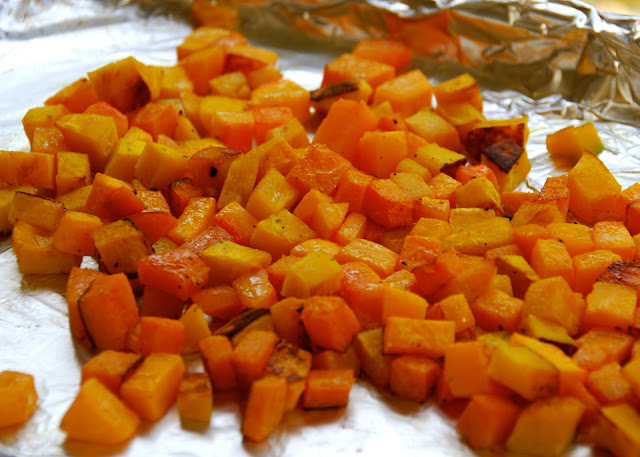
Butternut squash cut into cubes 
To whip goat cheese: In a food processor, combine goat cheese, salt and pepper along with 2 Tb olive oil and pulse till the goat cheese smoothes out slightly. Be careful to not over whip the goat cheese, as it will become watery. 

Before serving, melt 1 Tb butter until it just begins to brown. Add the squash and sauté for 1 minute to reheat and lightly color. Add the hazelnuts along with a touch of olive oil to stop the browning of butter. Add in the farro, ¼ C vinaigrette and sauté another minute or so to marry all the flavors. Move to a large bowl – add additional ¼ C of vinaigrette to taste and gently mix.
Chopped hazelnuts. You can substitute walnuts.
With the squash and nuts mixed in
To assemble on a large serving dish family-style or individual plates, spread the whipped goat cheese on the bottom of warmed plates. Mound the farro-squash mixture in the center of the plates. Toss watercress with vinaigrette just to coat leaves (don't overdress) and season with salt and pepper. Top warm farro with watercress and drizzle more vinaigrette around plate for serving.

The final product!
Variations, which would work equally well, would be to substitute other sweet squashes for butternut such as kabocha. One could crumble the goat cheese on the top in lieu of whipping and placing it on the bottom of warmed serving dish. Lastly, walnuts would work equally well and substitute for hazelnuts. This is such a healthy, filling and tasty dish – whether served as a vegetarian entrée or a side dish – it is a great way to introduce farro into your diet.  You, your family and friends will be delighted. I would serve with a California Pinot Noir, Mouverde or Tempranillo.  For white wine options, I would suggest a dry Reisling from Germany, Pinot Grigio or Viognier.

Give farro a try.  You will not be disappointed. I certainly plan to continue to play with this wonderful versatile grain and develop more recipes to share.

Buon Appetito!

Larue

Wednesday, March 20, 2013

Potato Gratin with Caramelized Onions & Prosciutto

Potato Gratin with Caramelized Onions & Prosciutto

Serves: 8 – 10

Potato Gratin with Caramelized Onions & Prosciutto 
Close up with yummy potatoes!
I must have the worse filing system for recipes. I pull them from magazines, newspapers, friends – anywhere and store them (not well) until I have the time and interest to give them a try. This is one such recipe. It was published in the LA Times under the banner of Best of 2009. I made it for Christmas Eve and served with Prime Rib – yes over indulgence!  But, it truly is amazing…so I remade it with a few modifications to share with you. There is no reason it should have taken that long to make it to the top of the heap of things to try…just needed the right occasion.

The caramelized onions can be prepared separately. In truth, the best time to caramelize onions is the day before. They do take some time to do it right. Often enough, you need to have them ready before you can start on the rest of the dish. But, you will be rewarded with a deep, rich, sweet flavor as the natural sugars in the onions caramelize. You can caramelize any type of onion – some just do so more quickly than others depending on their sugar content. Make some extra, as they are terrific on sandwiches, pizzas, over pastas, in soups on meat, fish and egg dishes and adorning appetizer platters. Store refrigerated for several days in an airtight container.

I use a mandolin to get the potatoes evenly and thinly sliced. This is one great tool, but easy to get a little of yourself in the dish if you are not careful. The metal ones from France can cost well over $100 but they can now be purchased for a third of the cost at department and kitchenware stores. It is a tool I use often and will share additional recipes in the near future featuring its use.

Caramelized onions:
  • 5 pounds brown onions (about 6 large)
  • ½ C olive oil
  • 1 Tb salt

Gratin:
  • 3 pounds waxy (low starch) potatoes, unpeeled
  • (Such as Red potato, boiling potato or new potato, Peruvian purple potatoes and fingerlings – or, in a pinch, Yukon gold)
  • 3½ C milk
  • ½ C heavy cream
  • 2 cloves garlic, crushed
  • 1 bay leaf
  • 2 tsp salt
  • Butter
  • 1 C caramelized onions
  • 4 slices prosciutto, thinly sliced crosswise
  • 3 ounces Gruyere, Comte or Emmentaler cheese, very thinly sliced or grated
As mentioned above, I recommend making the caramelized onions the day before. Cut off the stem and root ends of 5 pounds of onions, halve them lengthwise and peel away the dried brown skin. Cut the onions lengthwise into one-fourth-inch thick slices. Place in a heavy 7-quart pot. Pour ½ C olive oil and 1 Tb salt over onions, stir to combine. Set over medium heat, cover, and cook until the onions begin to wilt, stirring every 10-15 minutes to minimize sticking. As the onions soften, they will reduce in size quite dramatically.  After 20-30 minutes, they will be quite soft and will begin to stick to the bottom. Reduce the heat to low and continue cooking with the pot covered, stirring every 10 to 15 minutes to keep from sticking. After about 50 minutes, the onions will be silky and swimming in moisture. Remove the lid and increase the heat back to medium. 
Onions ready to caramelize
Mmmmmm.....getting close!
Cook, stirring frequently, until the moisture has mostly evaporated and the onions have begun to turn golden, about 30 minutes more. It will take another 20 minutes until the onions really begin to brown more deeply. Watch carefully to prevent sticking and burning. Continue cooking until onions have been reduced to a deep, reddish-brown marmalade. Set aside or refrigerate for future use.
Caramelized onions with red golden color
Heat the oven to 375 degree F and put a jellyroll pan in the bottom of the oven to catch any drips. Slice 3 pounds potatoes (unpeeled) as thinly as possible. A Japanese slicer, mandolin or V-blade is quite useful (see picture).
Slicing the potatoes with a Mandolin. Be careful!
Put the potatoes in a 3-quart saucepan and add 3½ C milk, ½ C heavy cream, 2 crushed garlic cloves, 1 bay leaf and 2 tsp salt. Cover and bring to a gentle simmer. When the liquid starts to bubble around the edges, remove the lid and cook until the potatoes are firm but tender, about 20 minutes in all. 

Ready to cook....
Rub the inside of a large gratin dish with a generous amount of butter. Using a slotted spoon, transfer about half the potatoes to the dish and arrange them in an even layer. Stir together the caramelized onions and 4 slices prosciutto and distribute evenly across the potatoes. It should be just enough to form a very thin layer.
Prosciutto for a little extra flavor
Pour the remaining potatoes and cooking liquid into the gratin dish, arranging the potatoes in an even layer. There should be enough liquid to almost cover the potatoes. Scatter 3 ounces grated Gruyere cheese over the top. Bake until the top is bubbly and evenly browned, about 1 hour.
The final product
This is a wonderful side dish for most any entrée. I served it with Prime Rib for a special meal but it also goes well with roasted chicken, turkey and any beef dish.

Enjoy!  We certainly did.

Larue 

Tuesday, March 12, 2013

Thai Chicken with Amazing Hot-Sour-Salty-Sweet Sauce


Thai Chicken with Amazing Hot-Sour-Salty-Sweet Sauce

Serves: 4
Thai Chicken with Amazing Hot-Sour-Salty-Sweet Sauce
Are you tired of chicken cooked the same way?  Looking for something with a different and more complex taste? Try your hand at Thai cooking. Thailand is condiment heaven with a gazillion sauces. This northern Thai-style recipe is extra sour because it has both tamarind and lime. Thai cuisine is most accurately described as four regional cuisines derived from those neighboring countries and regions. This particular recipe is from the north and northwest regions and thereby influenced by Burma and Laos. Most dishes of Northern Thailand are milder than those of other regions and patterned by Burmese influence.

The ingredient found in almost all Thai cooking, and easily found in most US grocery stores, is nam pla, a very aromatic and strong tasting fish sauce. It is prepared with fermented fish that is made into a fragrant condiment and provides a salty flavor. Another important ingredient in this particular dish is Tamarind. The concentrate can be found in many grocers, Asian markets and Mexican markets. Tamarind comes from a tree native to tropical Africa. The tree produces edible pod-like fruit, which are used extensively in cuisines worldwide. In Western cuisine, it is found in Worcestershire Sauce and HP sauce. In this dish, and in many Thai cuisines, it is an essential souring ingredient found commonly in sweet-and-sour sauces. The good news: tamarind can be stored at room temperature nearly indefinitely.
Tamarind
I love this dish with the entire chicken leg: thigh and drumstick attached. This can be obtained by asking your butcher to cut up the chicken.  I have seldom, if ever, seen it pre-packaged in this fashion. If unable to obtain, use chicken drumsticks and thighs.

Marinade:
  • ¼ C chopped cilantro
  • 2 Tb nam pla – Asian fish sauce
  • 1 ½ tsp fresh ground pepper
  • 4 WHOLE chicken legs

Dipping Sauce:
  • ½ tsp tamarind concentrate dissolved in 1 tsp water
  • ¼ C Nam pla – Asian fish sauce
  • 2 Tb fresh lime juice
  • 1 small garlic clove, minced
  • 1 small Thai chili, seeded and minced
  • 2 tsp sugar
  • 1 Tb water
  • ½ Tb vegetable oil
  • ½ C chopped cilantro 

Marinate Chicken: In a small processor, process cilantro, 2 Tb fish sauce and fresh pepper into a coarse puree. Coat chicken completely with pureed marinade.  Store overnight in the refrigerator or let stand at room temperature for 30 minutes.
Marinated chicken 
Prepare dipping sauce: In a bowl, combine the dissolved Tamarind concentrate with ¼ C nam pla, 2 Tb lime juice, 1 minced garlic, 2 tsp sugar and 1 Tb water. Set aside.
Dippin' sauce
Preheat oven to 400 degree F. Light grill. Remove chicken from marinade and rub it with ½ Tb vegetable oil. Rub grill gates with paper towel soaked with vegetable oil.  Grill the chicken over moderately high heat, turning, until charred, about 12 min. Transfer chicken to a baking dish and roast in warmed oven about 30 minutes, until cooked and thigh measures 150 degree F.

Just before serving, stir ½ C chopped cilantro into the dipping sauce. Serve with cooked chicken.
Sauce with cilantro
You will not be sorry after trying this simple dish. I used the sauce the next day with shrimp – equally great. My favorite wine with this, hands down, is a wonderful peppery, raspberry Zinfandel, such as one from Turley winery in Paso Robles.  You cannot go wrong.

Larue