Tuesday, April 24, 2012

Duck Breasts with Honey & Balsamic


Duck Breasts with Honey & Balsamic

The incredible photos for this post were done with the help of Carl Kravats. He is a true food photography artist, and I had an opportunity to take a class from him recently. For more information, see www.carlkravats.com.

For inexplicable reasons, I shied away from cooking duck for many years. I think I thought it was difficult to do. It certainly is not – or, at least not duck breasts. This one looks difficult, but it is a quick and easy mid-week or special guest dinner. In addition, duck is an excellent, lean source of protein as well as iron, selenium and niacin. For some reason, duck has gotten a bad “rap” through the years. Yet, it is comparable in fat and calories to a skinless chicken or turkey breast.

One of the keys to an excellent duck breast is crisping the skin properly, resulting in both great flavor and texture. The first step is to score the skin (see below) and season in advance, preferably 12 hours before cooking. In this dish, the breast gets what amounts to a cure, rich with spices, aromatics, and citrus. The second important step is cooking the breasts very slowly, over medium heat, skin side down, to render out the fat, pouring off the fat as they cook. When the skin is crisp, about 20-25 minutes, it’s simply a matter of briefly cooking the flesh side so that the meat is medium-rare.

With the fatty skin-side up and using a sharp knife, cut ¼ - ½ -inch crosshatch pattern in the skin of 4 duck breasts being careful not to pierce the meat. Do this while the duck is cold, since its difficult to make precise cuts at room temperature. Turn the duck breast over. Using a sharp knife, carefully trim excess fat from the meat side. If the tenderloins (the smaller piece of meat that runs along the bottom of the breast) are still attached, leave them on the breasts. Use a sharp paring knife to remove the small white tendon that runs through the tenderloin.  You will see a vein that runs the length of each breast. Run your finger down the length of each vein, and if any blood comes out, wipe it away with a paper towel.


4 duck breasts
Salt & pepper
Grated orange zest
Grated nutmeg
Balsamic vinegar
Thyme 
Bay leaf
1-2 Tb canola oil
3 Tb chestnut honey
2 tsp soy sauce
½ tsp optional fennel pollen 

Cutting a cross hatch pattern on the duck
Cutting the tendon, and then remove any remaining blood (gross).

Season the flesh (meaty) side with salt & pepper, grated orange zest, grated nutmeg, and a sprinkle of balsamic vinegar. Lay a sprig of thyme running lengthwise down the center of each breast and cover with one bay leaf. Turn over and season each breast with a generous pinch of salt and a grating of nutmeg. Refrigerate, uncovered, for at least one hour, or up to 12 hours.

Heat non-stick frying pan over medium-low heat. Add 1-2 Tb canola oil. Set a metal bowl or other container near the stove. With a paper towel, blot any moisture from the duck breasts. Remove and toss thyme and bay leaves. Season both sides of each breast with a pinch of salt. Add the duck to the pan, skin-side-down. Move the duck breasts every few minutes to help them brown evenly.  As the fat is rendered, carefully tilt pan remove the excess with a metal spoon (leaving about <1/8-inch) from the frying pan: Be careful to remove pan from the flame while doing so to avoid flare-up. Transfer fat to metal bowl. (save it – great to use later with vegies!) Cook the duck for a total of 20-25 minutes, until the skin is an even rich brown and very crisp. You may need to press the meat down to the pan so skin remains flat.
Rendering the fat and scooping it up!

Crispy skin
Turn breasts over and cook on the other side about 5 minutes (at this point, you could put into a 400 degree F oven for 5 minutes) The internal temperature should be 125-degree F for rosy medium-rare perfect duck breast!

Put the duck breasts skin-side-down on a cutting board, loosely place foil on top, and let it rest 5-10 minutes. Remove all fat from frying pan. Add 3 Tb chestnut honey, 2 tsp soy sauce, ½ tsp optional fennel pollen and 1 tsp balsamic vinegar. (one can substitute with your favorite honey should chestnut honey not be available) Mix.
Ingredients for the sauce

Making the honey and balsamic sauce

Put duck breast back into pan and coat with mixture. Deglaze with 2 Tb balsamic vinegar. Remove duck breast, slice on the diagonal into about 3-4 slices. Drizzle sauce over meat and around plate. Serve.  Now you can see how truly easy it is to make duck breasts.  Give it a try – you will be so glad you did.  Serve with a wonderful Merlot or California Pinot Noir for the classic pairing.  Sublime!

This recipe is a modification on a Duck Breasts with Chestnut Honey - which was shared with me in a cooking class a few years ago in Nice, France.  Many thanks to Rosa Jackson and her wonderful French cooking classes.http://www.rosajackson.com/


Enjoy!
Larue

Tuesday, April 17, 2012

Mushroom Salad with Yuzu Dressing


Mushroom Salad with Yuzu Dressing
The incredible photos for this post were done with the help of Carl Kravats. He is a true food photography artist, and I had an opportunity to take a class from him recently. For more information, see www.carlkravats.com.


I love mushrooms. I can just hear my sister, who hates them, moaning at the thought of a salad featuring a hefty dose of mushrooms. Is there any other vegetable that imparts as many different textures and flavors as the mushroom? And, they are healthy, very low in calories and fat free. How great is that!?

This recipe is so easy and different. Both the mushroom and the dressing really make for a unique salad that you will remember long past enjoying the flavors. It can all be served at room temperature or add the mushrooms to the greens when mushrooms are warm, which wilts the lettuce a bit, and makes for a unique salad. 

To make the dressing, whisk ½ C grapeseed oil with 3 Tb soy sauce, (Tamarin is my favorite), 3 Tb Yuzu juice, (can substitute 3 Tb lime juice & ½ Tb fresh orange juice), and 1 minced garlic clove in a small bowl. Taste for seasoning, add salt and pepper if needed. Yuzu is a Japanese citrus fruit which is about the size of a tangerine and quite sour. It is difficult to find the fresh fruit in the U.S. but the juice and the yuzu sauce can often be found in specialty food stores and Asian markets. Grapeseed oil is actually a vegetable oil pressed from the seeds of various grapes – usually a by-product of winemaking.  It has a moderately high smoking point – and, in this case, is important because of its clean light taste and high polyunsaturated fat content.

  • ½ C grapeseed oil
  • 3 Tb soy sauce
  • 3 Tb Yuzu juice
  • 1 minced garlic clove
  • 2 lb of fresh assorted mushrooms
  • 3 Tb extra-virgin olive oil 
  • ¼ C sake
  • 5 ounces of baby greens
Whisking the dressing
Carefully, using a damp paper towel, wipe clean as needed, 2 lb of fresh assorted mushrooms:  Today I used crimini, shitake, maitake (hen of the woods), bunapi and oyster.  While I would not use white button mushrooms – most any other mix would be terrific so you could also include enoki, chanterelle or wood-ear if they are fresh and available (see pics below). Mushrooms today are packaged in such a way that no extra cleaning may be necessary. You do not want to get them soaked as they will inhale the water and dilute the mushroom flavor. Just wipe them off if needed with a damp paper towel. Thickly slice or quarter all mushrooms.
Shitake
Cremini

Bunapi

Oyster
Maitake
Heat 3 Tb extra-virgin olive oil over medium-high heat. You will want the mushrooms to fit into your pan as one layer.  Do not crowd or they will steam instead of sautéing.  Once hot – add mushrooms, season with salt and pepper, and sauté until just beginning to brown.  This can take 5-10 minutes depending on your mushroom mix.  Add ¼ C sake, stir to coat the mushrooms, cook about one minute to burn off the alcohol, and transfer to a large bowl.
Mushroom melange

Sauteing the mushrooms
Add 5 Tb of your dressing, toss to coat. Check seasoning.

Divide about 5 ounces of baby greens on 6 plates.  Divide mushrooms among plates, mounding slightly in the center atop the greens.  Drizzle remaining dressing over greens and mushrooms.  Garnish with chives and serve.  Enjoy with a glass of Sauvignon Blanc. You will love the mix of flavors. 

Larue

Tuesday, April 10, 2012

Ossobuco ala Milanese


Ossobuco ala Milanese
OK…this one is a little more complicated! I find it very difficult to avoid ordering ossobuco (Ah-so BOO-co) in any restaurant that offers it. I do not remember where or when I first tasted a veal shank slow-cooked with tomato and white wine. After trying numerous recipes coupled with a desire to remain as authentic as possible, I finally settled on the following.

Slow oven braising is perfect for turning tough, but flavorful cuts of meat into amazing, fork tender meals. Veal shanks, in particular, are ideally suited for braising because they’re so high in collagen; the connective tissue breaks down in the moist, low heat of a braise and enriches the sauce like nothing else. Veal shanks, from the front and hind legs, work well in this recipe. There is much written on which is best. The hind shanks, which I used, can weigh a pound or more – are bigger and meatier – and more magnificent on presentation. However, the large size may be too much for one appetite. Whichever you buy, look for shanks that are no less than 1½ inches thick; 2 inches is best. If they’re too thin, they’ll braise too quickly and therefore won’t release enough collagen to make the sauce as exquisite as it should be.

To serve 4-6 people, you will need at least 4 large meaty veal shanks, about 3½ pounds total. Generously season both sides of shanks with salt and pepper. Pour ½ C all-purpose flour into a shallow dish. One at a time, roll the shanks around in the flour to coat, and shake and pat the shank to remove any excess flour. Discard remaining flour.


After browning the veal shank
Heat oven to 300 degree F. Put 2 Tb extra-virgin olive oil and 1 Tb butter in a wide Dutch oven or heavy braising pot (6-7 Quart size), and heat over med-high heat. When the butter has melted and the oil is shimmering, lower the shanks into the pot, flat side down; if the shanks won’t fit without touching one another, do this in batches. Brown the shanks, turning once with tongs, until both flat sides are well caramelized, about 5-7 minutes per side. Once done, transfer the shanks to a large platter or tray and set aside.

Discard any fat from the pot. Add 1 Tb olive oil, and then add 1 medium onion, chopped, 1 medium carrot, chopped, 1 stalk celery with leaves, chopped and 1 small fennel bulb, trimmed, cored and chopped. Season with salt and pepper and cook until the vegetables begin to soften and caramelize, about 5 minutes. Be sure to scrape the brown bits from the bottom and sides of the pot with a spoon or rubber scrapper as you go, so that the stuff does not burn and flavor the mixture.

Add 3 minced garlic cloves, 2 strips of orange zest, removed with a vegetable peeler (each about 3 inches by ¾ inch), 2 Tb tomato paste, 1½ tsp fresh (or ½ tsp dried) marjoram, and 1 bay leaf and stew for another 1-2 minutes. Add 1 C dry white wine or dry white vermouth, increase the heat to high, and bring to a boil. Boil, stirring occasionally, to reduce the wine by about half, 5 minutes. Stir in a pinch of saffron (about 10 threads) and ½ C fresh orange juice (from about 2 oranges). Add ½ C veal or chicken stock and 1 C chopped peeled tomatoes, fresh or canned, with their juice. Boil again to reduce the liquid to about 1 C total, about 10 minutes.
Place the shanks in the pot so that they are sitting with the exposed bone facing up, and pour over any juices that accumulated as they sat. Cover all with parchment paper, pressing down so the parchment nearly touches the veal and the edges hang over the sides of the pot. Cover tightly with a lid, and slide into the lower part of the oven to braise at a gentle simmer. Check the pot after 15 minutes, and if liquid is simmering too aggressively, lower the oven temperature 15-25 degrees. Continue braising, turning the shanks once midway and spooning pan juices over the top. Braise until the meat is “fork-tender” and pulling away from the bone, about 2 hours.
Braising the shanks
So much of braising depends on trapping the moisture in the pot so it can meld together with the natural juices of the food you are braising.  A secure lid is important but the addition of the parchment, reduces the headroom in the pot, which helps concentrate the braising juices further. In effect this creates a tight little cycle of evaporation and condensation and bastes the food directly.

If you wish to observe the Milanese ossobuco tradition strictly, you must add an aromatic mixture called gremolata to the shanks, when they are nearly done. It will add a kick of lemon, garlic and parsley. While the shanks are braising, stir together 1 tsp minced garlic, 2 Tb chopped flat-leaf parsley and 1 tsp grated lemon zest in a small bowl. Cover with plastic wrap and set aside in a cool place.  This will be your gremolata.

When the veal is done remove the pot from the oven and place it on the stove. Remove and toss the orange zest and bay leaf. Gently lift the shanks with a slotted spoon onto a tray or large platter, and sprinkle with ½ of your gremolata. Then cover it to keep them warm. Turn the heat to high under the pot and cook the sauce down until it is reduced to half, about 3-4 minutes.

Next pass the sauce through a food mill into a saucepot, pushing through as much liquid as possible. Scrape anything that sticks to the underside of the strainer; discard anything bigger that collects in the top without passing through. Thickness is essential to this sauce, so I use a food mill to create a passito, or “passed sauce,” bringing together the gelatin from the meat and the vegetable puree. If you don’t have a food mill, tip the pot and use a whisk to “pound” the sauce until it is blended and chunky. Do not put the sauce in a food processor or blender as the fat will emulsify and the sauce will smooth out instead of staying chunky and meaty. Taste the sauce for seasoning. Add salt and pepper as needed.
"Passing the sauce"
To serve – place a shank on each plate, cover with warmed sauce, add just a touch more gremolata before serving. The contact with the hot sauce will aromatize the gremolata and perk up everyone’s appetite with a whiff of garlic and lemon.

Ossobuco can be completely cooked a day or two in advance. In fact, if made in advance, you’ll actually enhance the flavor: ossobuco, like all braised meats, tastes better when its been sitting in the sauce awhile. Cover the meat with the sauce in an ovenproof container and store in the refrigerator overnight. Heat the next day in a 350 degree F oven until it is warmed through and you’re good to go. If you are using the gremolata, add it only when reheating the meat.

Italian restaurants in America often offer pasta or risotto as a side dish. This practice is unknown in Italy – with one exception: the happy pairing of ossobuco with risotto alla Milanese in the restaurants of Lombardy.

This hearty dish is best served with classic Italian red wines such as Barola, Barbaresco or Brunello di Montalcino. If unavailable, I would substitute with full-bodied red wine such as Cabernet Sauvignon.

Enjoy!
Larue

Tuesday, April 3, 2012

Almond-Apricot Biscotti


Almond-Apricot Biscotti


This is my rave review biscotti recipe. I have been making it for years – too many years and people always love it. Like all biscotti – as they sit in your kitchen, (if you can keep from eating them all in one sitting), they get drier and better. They also freeze well. I have packaged these up, mailed them to my kids at college, sent them on a picnic, wrapped in cellophane, tied with a ribbon, as a gift and served with gelato at an elegant Italian dinner. This recipe will make about 30 biscotti and can be made up to 2 weeks in advance if stored in an airtight container.

Line an 18” x 12” x 1” sheet cookie pan with foil or parchment paper. If foil, butter and flour the surface. Combine 2¾ C sifted all-purpose flour, 1½ C sugar, ½ C (1 stick) unsalted butter cut into pieces, 2½ tsp baking powder, 1 tsp salt, 1 tsp ground ginger in a processor. Process until fine meal forms. Add 4 ounces imported white chocolate (such as Lindt), cut into pieces and process until finely chopped. Add 1 2/3 C toasted whole almonds and chop coarsely, using about 8 on/off turns on the processor.


In a separate bowl, mix 2 large eggs, ¼ C plus 1 Tb apricot-flavored brandy and 2 tsp good quality almond extract.  Add flour mixture and one 6-ounce package of dried apricots, roughly chopped, to above apricot/brandy mixture and stir (or mix with your hands) until moist dough forms.

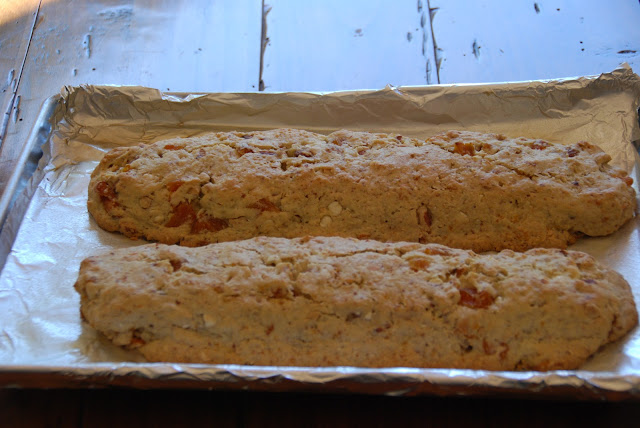
Drop dough by spoonfuls in two 12+ inch long strips on prepared baking sheet, spacing evenly. Moisten fingertips with water and shape each dough strip into 2-3-inch-wide logs. Refrigerate until dough is firm, about 30 minutes.

With rack in the center of oven, bake logs in a 350 degree F oven until golden, about 25-30 minutes.  Transfer to a rack to cool briefly.

Reduce oven temperature to 300 degrees F. Transfer logs to cutting board, using a sharp serrated knife, cut each log crosswise into ¾-inch-wide slices.  Arrange half of cookies cut side down on a cookie sheet. Bake 10 minutes. Gently turn cookies over and bake 10 minutes longer. Transfer cookies to rack to cool. Repeat with remaining cookies. Cool completely before packaging.


Serve alone or with gelato, ice cream or other dessert and a glass of Vin Santo, Muscat, coffee or cappuccino. 

Larue