Wednesday, December 7, 2011

Olive & Sun-dried Tomato Fougasse

Olive & Sun-dried Tomato Fougasse
I love making bread.  I find it therapeutic – especially kneading the warm dough – as well as rewarding – the whole kitchen smells wonderful while baking (thank you, yeast!).  Additionally, the activity of kneading will give the baker a chance to work the upper body muscles, and gain some physical conditioning from the process as well!  OK - so there are a few more steps to making bread...but it really can be done!  So - give it a try.  It is worth it!!!

Pour 2/3 C warm water (105-115 degrees F) into a measuring cup, sprinkle 2 tsp instant yeast*, then 1 tsp sugar and stir.  Let stand until the yeast dissolves and mixture bubbles…about 10 minutes.  Add 1 C warm water and 4 Tb extra-virgin olive oil.
Bubbling yeast
Mix 4½ C Bread Flour** and 1½ tsp kosher salt in mixing bowl. Pour in yeast mixture.  If using a stand mixer, attach the dough hook; beat at med-low speed until flour is moistened but looks shaggy, about 4 minutes.  Increase speed to medium; beat until the dough pulls away from the sides of the bowl and climbs the hook, for a minimum of 10 minutes. I usually use my mixer for 5-6 minutes of this time and do the rest by hand – I love the feel and texture of making bread. Sprinkle your work surface area with flour to knead. (It can be any smooth surface – but wood, marble or granite work best)
Dough hook and mixer with dough
Whether by machine or hand, kneading is one of the most important steps in bread making of any kind. This step more than any other will determine the outcome. It develops the flour’s gluten, or protein, into long, stretchy strings and traps the carbon dioxide bubbles released by the yeast as the dough rises. As the flour that makes up the dough is moistened and stirred, the gluten begins to form and also gains in strength as the dough is subjected to the kneading process. Gluten can be thought of as the binding agent within the dough, allowing the loaf to take on a cohesive texture that will allow the substance to not fall apart during baking. This also helps to make the bread fluffy. If you don’t knead enough then the bread will be too dense. If you knead too much then the gluten will get too tough which will make your bread tough.
Mix ½ C oil cured black olives (for example, kalamata olives), pitted and quartered, ½ C drained oil-packed sun-dried tomatoes, chopped, 2 tsp grated lemon peel and 1 Tb minced fresh rosemary in a medium bowl. Add to dough and mix for 1 min.  Then, mix again, but only by hand, until thoroughly mixed throughout dough.
Dough with olives and sun-dried tomatoes
Lightly oil a large bowl with olive oil, put dough inside, brush top with olive oil and sprinkle lightly with bread flour.  Brush plastic wrap with oil, cover bowl, oiled side down, and let dough rise in a warm draft free area until at least doubled in size. (1-2 hours)
Rising dough and oil brushed pan
Gently turn dough several times with a spatula to deflate. Re-cover the bowl with oiled plastic, chill overnight.  Alternatively, line a 17x12-inch sheet pan with parchment paper and brush with olive oil. When you turn dough out – form into a rectangular shape, spray with olive oil on top, add sprinkling of bread flour and cover with oil sprayed plastic wrap. It is often easier to store a sheet pan in the refrigerator than a large bowl.
The next day, remove from the refrigerator. Divide dough into two equal pieces. Place one piece on a floured work surface; sprinkle with flour. Roll out dough to 12x8 or 12x9-inch rectangle, sprinkling with flour to keep it from sticking. Transfer dough to a baking sheet, which has been brushed with olive oil. Repeat with other piece.  Allow dough to sit and rest in draft-free area for 2-3 hours.
Dough in pans
Using a very sharp knife cut four 2-inch-long diagonal slashes just to the right of center of rectangle and 4 more just to left of center to create a pattern resembling leaf veins.  Pull slashes apart with fingertips to make ¾ to 1-inch wide openings. Repeat with remaining dough.  Cover both with warm towel. Let them rest 30 min or more. Beat 2 tsp water and 1 Tb olive oil in a small bowl to blend to make the glaze.
Dough with knife cuts
 Position 1 rack in top third and 1 rack in bottom third of oven; preheat to 450 degree F. Gently brush fougasse with glaze; sprinkle with coarse kosher salt and pierce all over with a fork.
Bake fougasse 10 minutes. Can you smell it!!??  Reverse position of baking sheets and turn around.  Bake fougasses until golden, about 10 minutes more. Sprinkle with good quality finishing olive oil when it comes out of the oven.  Transfer to racks, cool 15 minutes. Serve warm or at room temperature.  It freezes beautifully if by some miracle it is not consumed immediately.

*Instant yeast = I prefer instant yeast as it is more concentrated than fresh or active dry yeast, and has a longer shelf life.  It can be stored in the refrigerator in an airtight container for months or in the freezer for a year.
** Flour = Flour is the core of the bread – the body containing its heart and spirit. Wheat is the grain of choice, from which flour is milled. This is because wheat contains more gluten than other grains. In the US, cake flour has 6-7% gluten, pastry flour has 8-9% gluten, all-purpose flour has 10-11.5 % and bread flour has 11.5 – 13.5% gluten. Gluten is what determines the texture and taste of the bread. For those of you thinking about gluten free diets, please note that the illness caused by immune responses to gluten (celiac disease) is INCREDIBLY rare! Don’t worry about gluten unless your doctor tells you to avoid it.

Sunday, December 4, 2011

Zucchini Patties with Feta

Zucchini patties with feta

A simple and tasty Mediterranean vegetarian entrée, side dish or appetizer can be assembled in less than an hour and cooked in 10 minutes.  Who wouldn’t love it?  Even those who are iffy with zucchini will find this flavor combination delectable.  I love to serve it with a dollop of plain Greek yogurt – so creamy and healthy to boot. Tzatziki, sour cream or crème fraiche would also work. You can adjust the size of the pattie and it becomes an entrée or a bite sized appetizer.  So versatile!
Cut off the two ends of 3-4 medium sized green zucchinis. Using a simple box grater, large hole side, coarsely grate the zucchinis. Toss with about 1 tsp of salt and let it rest in a colander in your sink or over a bowl.  Probably the most important part of this recipe is to get all the ingredients as dry as you can so it will quickly fry later (and not boil instead !) Let the grated zucchini stand in colander for at least 15 min – 30 is better.  Press out excess liquid.  I roll it up in a kitchen towel – which, of course, will need to be washed after but it sure gets that last bit of moisture out.
Grated zucchinis
 Place zucchini in a dry bowl, gently mix in 1 large whole egg, 1  large egg yolk, ½ C (or more) of fine bread crumbs or panko, ½ C crumbled feta cheese, 1 C chopped parsley, ½ C finely chopped green onions, and 1½ Tb chopped fresh dill. Other optional additions (which I love to add) are 2-3 minced garlic cloves, 2 -3 Tb chopped sundried tomatoes, and/or toasted pine nuts. If the batter is very wet, add more breadcrumbs or panko.
It is often useful to fry up a small amount at this time to test seasoning. Feta cheese is highly variable on its saltiness and you may need to add additional salt to the mixture before the final frying. (See below for discussion of the various feta cheeses)
Heat 2 Tb olive oil and 2 Tb corn oil in a large skillet over medium heat. Working in batches, drop the batter by rounded tablespoons into skillet. Hint: Use a small ice cream scoop to get even measured spoonfuls. Fry the patties until golden, about 5 minutes per side, adding more olive oil and corn oil as needed.  Transfer to paper towels.  Keep it in a warm oven until served. Serve with a dollop of plain Greek yogurt, Tzatziki, sour crème or crème fraiche.
Frying the patties to a golden brown
 This can be made one day ahead. Once fried, place on a baking sheet, cover and chill. Rewarm uncovered in a 350-degree oven for 12 – 15 minutes.
This would be excellent served with a Sauvignon Blanc or a dry Rose – or best yet, Champagne Rose!!!  But, then, everything goes with Champagne.
Regarding Feta: We have access to a wide variety of feta cheeses. Feta is salted and cured in a brine solution for several months.  When removed from the brine, it dries out rapidly.  The degree of saltiness relates to its preparation as well as source. It was initially made with goat or sheep’s milk. However in the US, much is often produced commercially with pasteurized cow’s milk.  Look carefully at the label and taste the feta so you will know its saltiness.
Greek Feta would be most authentic here.  To be Greek, is must be made from at least 70% sheep’s milk, often with a little goats milk blended in. It is often the saltiest as well as tangy, rich and creamy.  My favorite is French feta which is usually made with sheep’s milk – is less salty, mild and creamy.  My least favorite, American feta, can be made with sheep, goat or even cow’s milk – often tangy but usually less creamy and more crumbly.  (usually promoted as a salad addition)

Saturday, November 19, 2011

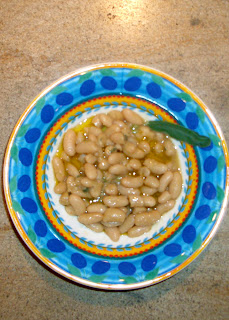
Cannellini Fresca

Cannellini Fresca
-->
Cannellini Fresca
People are amazed that simple white beans can taste so very good. This is an old and simple Tuscan recipe. It requires prior planning in that one must start with high quality dried cannellini beans and soak them overnight before cooking. I adore them as is – warmed or at room temperature.  Italians use them often in soups, as a side dish, or pureed as a topping for bruschetta.  They have a creamy texture and mild flavor that are perfectly suited to carry the flavors of fresh herbs and a finishing olive oil.  Give this simple recipe a try – you will not be disappointed and will have a wonderful new healthy protein source in your diet.
I recommend getting your dried cannellini beans from a source where you have confidence that they are not too old. Rancho Gordo beans are the best and becoming more available all the time. (www.ranchogordo.com). Or try an Italian market or organic health-food store as the turnover is likely greater so the beans will be freshly dried. Pick through 2 C dried cannellini beans and discard any discolored or broken ones and any stones. Rinse the beans gently but thoroughly under cold running water.  Place in a large bowl or pot with enough cold water to cover by several inches. Let them soak overnight or for at least 6 hours.
Soooooo…if you did not soak overnight, you can do the quick soak method. Put the beans in a large pot, cover with at least 2 inches of water.  Bring the beans to a boil over medium heat for 1-2 minutes. Cover the pot and let them stand for 1 hour.
Drain the beans and place in a medium saucepan. Add 4 C water, 2 Tb chicken or vegetable bouillon, 3 sprigs of fresh sage, 3 crushed garlic cloves, 2 Tb olive oil.  Bring to a boil.  Then, lower heat, cover and gently and slowly simmer until beans are tender, about 1 hour. As beans do not all cook at the same rate, pull out 5-6 beans from random parts of the pot. If they are all soft, then they are done. Allow them to cool in their liquid.
Once cool, drain beans, reserving about ¼ - ½ C cooking liquid, and transfer to a bowl.  Add the reserved cooking liquid, 2-3 fresh sage leaves, minced, 2 Tb minced green onions, 2 TB olive oil and 2-3 tsp. salt & freshly ground pepper to taste.  Toss gently.
Drizzle a wonderful finishing olive oil over the beans before serving. Sublime!  Give this a try – you will not be disappointed and let me know your thoughts!
 Larue

Fried Egg with Squash and Tomatillo

Fried egg with squash and tomatillo
 Fried Egg with Squash and Tomatillo

This taste explosion of this entrée comes as a surprise – the tangy tomatillo sauce creates the bed for the caramelized squash with the egg providing both a protein source and sauce to bathe the dish.  The recipe is surprisingly simple, taking less than 40 minutes to prepare – add a green salad, some bread and you are done. It will serve 4 and provide an elegant entrée.
Turn on the broiler.  Place 1-2 jalapenos halved lengthwise, ½ lb tomatillos and 2 peeled garlic cloves in an ovenproof dish and broil until the tomatillos are charred, about 7-10 minutes.
Tomatillas
Roasted tomatilla, jalapeno, and garlic
 Swirl 2 Tb olive oil in a large skillet, heat.  Add 4 ½ C one inch diced yellow and green squash. (About 1-¼ lbs).  Add squash in a single layer in skillet – if necessary do 2 batches.  Salt and cook 4-5 minutes or until caramelized.  Stir and cook 4-5 min more, or until tender. Remove from heat; stir in 3 Tb chopped fresh cilantro. Season as needed with additional salt. Cover to keep warm.
Carmelized squash
Transfer tomatillo mixture from broiler to blender with 4-5 sprigs of cilantro. Blend on high until smooth.  Slowly add 2 Tb olive oil to blender.  Season to taste with salt and 2 tsp fresh lime juice.  Set aside, cover to keep warm.
Using a nonstick frying pan, add 1 ½ Tb olive oil and heat.  One at a time, crack 4 eggs into a small bowl. Tip the bowl gently, sliding the egg into the heated pan. Repeat with all 4 eggs.  Keep the heat low so you can control the cooking. Season with salt and fry 3-4 minutes, or until the whites are cooked and the yolks just begin to set (if you cook too long, you lose the “sauce” for the dish).  It is sometimes useful to put a lid on the pan to encourage the whites to set up.
To serve, spoon 4-5 Tb warm tomatillo sauce in 4 shallow dishes. Mound roasted squash in center. Top with fried egg. Garnish with cilantro sprig and lime wedge and serve immediately.  Sit back and take in the praise.  Really.
Larue

Friday, November 18, 2011

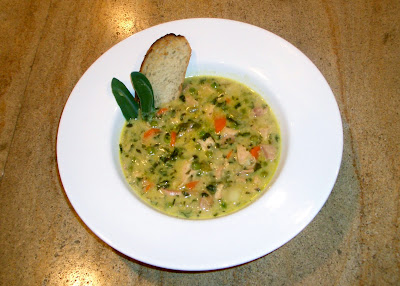
Turkey Soup


Popeye Soup

Popeye Soup = Turkey Soup
While it is possible that neither Popeye nor Olive Oyl made this soup, we sure used the reference to encourage our kids to eat the green leafy vegetable.  The popularity of Popeye the Sailor helped boost the sales of spinach with consumption reportedly increasing 33% is the US in the early 1930’s when Popeye was popular.  A more recent study in 2010 continues to show increased consumption after watching the cartoon.  I never had this experience and had to find a way to disguise the spinach to encourage consumption by our kids.  Popeye soup was our answer.  And, they loved it!
Sauté 2 chopped onions in ¼ C butter until translucent but not browned, about 10 minutes. Stir in 2 Tb flour and 1 ½ tsp curry powder and cook for 2-3 minutes. Add 3 C chicken broth, 1 C chopped potatoes, ½ C thinly sliced peeled carrots, ½ C sliced celery, 2 Tb chopped fresh parsley, and ½ tsp dried sage or poultry seasoning. Bring to a boil and reduce heat to low, cover and simmer 10 minutes.
Add 2 ½ C cubed cooked turkey, 1 C ½ & ½, 10 oz. package frozen peas and/or 10 oz. package chopped frozen spinach. Simmer 15 minutes.  Season to taste with salt & freshly ground pepper. Serve hot, perhaps with some garlic toast, and watch the kids (and husbands) unknowingly devour a healthy serving of spinach!
Larue

Southwestern Turkey Chili

Southwestern Turkey Chili

Southwestern Turkey Chili
Without fail, I always have more leftover turkey after Thanksgiving than is needed for several days of turkey sandwiches. But with minimal extra effort, you can turn these leftovers into a special meal…one that can be frozen and enjoyed even months later. I will be sharing my two favorite post-turkey day recipes – use white and/or dark meat.  The first, Southwestern Turkey Chili, is easy to make – has a bit of a southwestern twist with Anaheim chilies and black beans.  It’s nice to change up after a few days of sandwiches.
Melt 1 stick of unsalted butter in a large pot.  Add the following ingredients: 2-3 medium Anaheim chilies (seeded & chopped), 2/3 C chopped red onion, 2/3 C chopped parsley, 2/3 C chopped red bell pepper, 1 large chopped leek,(white part only), 2 minced garlic cloves, and 2 Tb dried oregano. Sauté in butter until vegetables soften, stirring occasionally, about 10 minutes. 
Anaheim chilies
Leeks
Veggies ready to begin cooking
Reduce heat to low, add ¼ C flour, 1-2 Tb chili powder, 2-3 Tb ground cumin and 2 tsp salt – cook 5-10 minutes, stirring frequently until nearly all the liquid has evaporated and they begin to stick to the pan – you want to brown until crud starts to form on the bottom of the pan. Stir occasionally to scrape up the brown bits, then let the crud form again.  Be patient here and don’t rush it – this is where the big flavor develops.
The "crud"
 Add 4 C chicken stock and bring to a simmer. Scrap the crud and mix (dissolve) into your soup. Puree 1 ¼ C frozen corn with ½ C chicken stock in a processor or blender.  Add this puree to the chili.  Mix in 3 cans of rinsed and drained black beans, 4 C diced cooked turkey and 1 C frozen corn. Simmer chili 20 minutes, stirring occasionally.
Serve with assorted toppings: grated cheddar cheese, sour cream, chopped red onion and/or chopped fresh cilantro.  This is wonderful any time of the year – it freezes beautifully and travels well.  You, your friends and family will not be disappointed.
Enjoy!
Larue

Tuesday, November 8, 2011

Smoked Salmon & Chevre Quesadilla with Cucumber Relish

Salmon and chevre quesedilla
Without exception, this little appetizer brings compliments and recipe requests. It is easy to pull together and fun to serve.  The relish should be made several hours in advance; the quesadilla can be assembled 1-2 hours before baking and serving.

To make the relish: Very thinly slice or cube one hothouse cucumber into a bowl.  Add 2 Tb chopped shallots and 1 Tb minced fresh dill. Set aside. In a small saucepan, combine ½ C white vinegar, ½ C water, ½ C granulated sugar and 1 tsp salt. Bring to a simmer and stir to dissolve the sugar and salt. Pour hot dressing over cucumber mixture and let cool to room temperature or chill.

To make the quesadilla: Divide 5 oz. montrachet goat cheese evenly among 5 medium sized flour tortillas.  Use your fingers to spread it around the entire tortilla. Top cheese with ¼ lb. thinly sliced smoked salmon divided among tortillas. Add a sprinkling of ¼ C chopped green onion and 1 ½ Tb fresh dill.  Place another flour tortillas on top of each one and gently press down.

Preheat oven to 500 degrees F. Arrange quesadillas on a sheet pan, lightly oiled with vegetable oil. Lightly brush the top with oil and bake for 5 min or until crisp and golden.

Slice into quarters or eighths and serve with the cucumber relish on the side for guests to add as desired.  So great –It’s a tangy relish with slight crunch of the baked tortilla encasing the smoking salmon and creamy goat cheese. 

--Larue

Friday, November 4, 2011

Shitake Crusted Halibut with Lemon Beurre Blanc

Shitake Crusted Halibut - serves 4
It was another football Sunday and my good friend, Joy, and fellow Cavalier dog lover, was joining us. My husband had put in a request several days before for Barbeque Ribs.  Sounds easy, right?  But Joy and her husband do not eat red meat. So I had to come up with a protein dish for them that would be super easy to pull together while still watching the game! (The ribs can be done well in advance and reheated on the grill at halftime)  If the shallots are cut in advance – this amazing little dish can be prepared during half time! The Beurre Blanc (white butter sauce) is also easy – not exactly dietetic but really compliments the earthy flavor of the shitake crust on the fish.

To serve 4: Preheat the oven to 450 degrees F. Melt 2 Tb butter over medium heat.  Add ½ C finely chopped shallots and cook until softened but not browned. (about 2 min), Add ¼ C white wine and cook on medium- high heat until most of the liquid evaporates, about 3 min, being careful to not burn the butter.  Add ½ C heavy whipping cream and simmer gently until sauce thickens, whisking occasionally, about 4-5 min. Cover and set aside off heat.
Making beurre blanc
Place 1 ½ oz. dried shitake mushrooms (remove all stems) in a spice grinder (I use a dedicated coffee grinder for all spices and savory) or blender and grind to a fine powder. Transfer this powder to a plate. Rinse 4 6 oz halibut fillets in about 1-2 Tb of white vinegar. Sprinkle with salt and pepper. Then press the fillet into the mushroom powder to coat it on all sides. Melt 4 Tb butter in ovenproof skillet over medium heat.  Add fillets and cook until golden brown on bottom – about 3 minutes. Turn over carefully and transfer to the oven and bake until opaque, about 7 minutes.
Rolling fillets in shitake mushroom powder
Cooking fillets until golden brown
While fish is baking, finish the sauce. Add 4 Tb butter, cut into small cubes, to the sauce, one at a time, whisking until incorporated before adding more. Heat on low if needed to melt butter and warm sauce. Do not let it boil. Whisk in 3 tsp. lemon juice and season with salt & pepper.  Drizzle fish with sauce and serve immediately.  Pass extra sauce at the table.  Bon Appetit!

P.S. If pressed for time or wanting to avoid the calories – a sprinkle of lemon juice works as a substitute for the sauce. If Halibut is unavailable, you could use cod, salmon or Tilapia  (cook tilapia on stove-top).

--Larue

Sunday, October 30, 2011

Black Beans with Garlic, Cumin & Cilantro

Black beans with garlic, cumin, and cilantro
Black Beans with Garlic, Cumin & Cilantro
When it comes to at least two different categories of nourishment – protein and fiber – few foods have as solid a nutritional profile as black beans.  They contain a mix of healthy carbohydrates, plenty of dietary fiber in addition to a good dose of protein.  They are very low in fat as well and contain no saturated fat.  Lastly, they contain loads of flavonoids, felt by many to have an anti-oxidant effect.

This particular recipe is so very simple, can be made in less than 15 minutes – and tastes amazing – actually quite addicting.  Try it tonight – and everyone will thank you.

Rinse one 16 to 19 ounce can of whole black beans and drain. In a nonstick skillet, heat 2 Tb olive oil and add 2 minced garlic cloves and 1 tsp. ground cumin over low-medium heat until the fragrance of cumin and garlic waft up. Do not let garlic brown, or it will be bitter.  Add drained black beans, 1/3 C tomato juice (or water) and ¾ tsp. salt and cook, stirring, until beans are heated through.  Stir in 2 Tb chopped fresh cilantro.  Serve and sit back and take the compliments!
Black beans served with chicken and spinach enchiladas (see previous post)
--Larue

Chicken & Spinach Enchilada with Salsa Verde

Chicken and Spinach Enchiladas...with cute doggie Humphrey supervising in the background!
Chicken & Spinach Enchilada with Salsa Verde
I first made this recipe about 20 years ago as a sneaky way to get spinach into my kids AND husband.  The sneak approach worked beautifully – so much so that they would beg for the enchiladas and request to eat the filling alone!  Since that time, I have modified it quite a bit to decrease the calories and fat – but it is still fantastic.

I love the tangy flavor of salsa verde. The green color comes from the use of tomatillos.  The addition of lime juice & jalapeno pepper create the zesty flavors. Tomatillos are in most grocery stores – small green tomatoes with thin inedible paper-like husk formed by the calyx.  As the fruit, (yes, tomatoes are fruits),  grows and expands, it breaks this husk.  A tomatillo at peak should be bright green & firm and the husk broken.  It is easy to pull the husk off – toss it – the remaining tomatillo will likely have a sappy sticky coating that is easily removed with water (see pic).
Husking the tomatillos
Remove the husks of 1 lb of tomatillos – put into a pot, cover with water and boil 10 minutes. Cut open 1-2 jalapenos removing the stems, ribs and seeds.  Be very careful – work in a well ventilated area, wear gloves and do not touch anything else, especially your face, until you have thoroughly washed your hands. Using a food processor- process 4 cloves garlic, then add jalapenos, 1 coarsely chopped onion and cooked tomatillos.  Pulse several times to mince.  Put into a bowl, add salt & pepper, ½ Tb sugar, 1-2 chopped red tomatoes & ½ C chopped fresh cilantro.  Stir and set aside. You have now made tomatillo salsa (see pic). Congrats!
Tomatilla salsa

Grate ¾ lb cheddar cheese and ¾ lb Monterey jack cheese.  I use light versions when they are available.  Mix and add ¼ C grated Parmesan cheese. Set aside.

Take 2 cooked & boned chicken breasts – put into food processor. Pulse until finely minced. Put into a bowl. Alternatively you could thoroughly shred the chicken but it makes it harder to hide the spinach! Take 2-3 bunches of cleaned spinach, wash, and cooked – and squeeze dry in paper towels – Pulse in processor and add to chicken. (alternatively could use frozen and thawed chopped spinach – still needs to be squeezed dry) Add spinach to chicken. Add 2 C light sour cream, 1 bunch chopped green onions, 1 C of the tomatillo salsa and 2 C of the cheese mixture. This is the filling for your enchiladas (see pic).
Enchilada filling with chicken and spinach
You can use corn or flour tortilla – white or whole wheat.  If you choose corn – you will need to fry it lightly in corn oil to soften the tortilla before assembly.  You will need about 12 medium tortillas.

Assembly: Put about 1 C salsa in the bottom of a 10 x 12 x 2” baking dish- spread to cover the bottom. Place about 6 Tb of the meat mixture into a tortilla. Carefully roll and place seam side down into dish.  Continue until you have filled all 12 tortillas.  Pour remaining salsa over the top and top with remaining cheese.  Bake in a 375 degree F oven for 25 min – or lightly browned on top.
Filling the tortilla
I love serving this with Black Beans (see blog for Black Beans with Garlic, Cumin & Cilantro) and a green salad.  A Beer or Margarita would be a great addition as well.  

-- Larue

Wednesday, October 26, 2011

Curried Chicken Salad

Curried chicken salad....enjoy with a nice chardonnay
 Curried Chicken Salad
If you have leftover chicken or just purchased too much rotisserie chicken – this is the perfect use!  Or, if the craving hits and no cooked chicken is in sight, just buy a couple plump chicken breasts and quickly cook it up for use….no need to season, there is plenty in the rest of the salad.

I love serving this mid-week – so simple to make, easy to pull it together in under an hour…add some vegetables to the plate (we had broccoli tonight as I was craving green!). Perhaps serve with some bread – or naan to complement the curry.

To serve 6, start with about 1 ½ lb chicken – I like a mix of white and dark meat.  Tonight I simply used rotisserie chicken from the grocery store and removed the skin and bones.  Chop the chicken into ½ inch pieces.

In a separate bowl, whisk together 1/3 C mayonnaise, ½ C plain yogurt, 5 tsp curry powder, 1 ½ Tb fresh lime juice, 1 tsp honey, 1/2 tsp salt, ¼ tsp freshly ground black pepper and optional ½ tsp ground ginger.  Add chicken, 1 medium red onion, chopped (1 C), 1 firm mango (3/4 lb) that is peeled, pitted, and chopped, 1 C halved red seedless grapes, ½ C coarsely chopped salted roasted cashews. Stir gently to combine.

This can definitely be done ahead of time – even stored overnight. Great picnic fare or for a book club. Possible substitutions: cranberries instead of mango, pecans or toasted almonds instead of cashews.

This would be best with a white wine, especially a Chardonnay or Gewurztraminer. Bon Appetit!

--Larue

Tuesday, October 25, 2011

Susan's Simple Spicy Pecans

Susan's Spicy Pecans!


Susan’s Simple Spicy Pecans
If you are craving something sweet but with a kick – and throw in mucho crunch – you are craving my close friend Susan’s spicy pecans.  She makes these as Holiday gifts every year.  Lucky for me, she also makes them as a hostess gift.  This generates many dinner invitations so I can get a regular allotment of these delights. I confess we almost never share with other guests – just quickly hid them for later consumption.

The recipe is amazingly simple – and the nuts last a long time in a sealed plastic bag.  Well – their longevity is depends on whether you munch on these continuously like we do.

Mix together 2 Tb sugar, 1 ½ Tb brown sugar, 1 tsp salt, ½ tsp  black pepper and ½ tsp of cayenne pepper (or more if you like more zip).Take 2 C whole pecans and sauté in 1 ½ Tb butter over med-high heat until hot. Add the above dry ingredients and sprinkle over hot pecans. Let it cook, stirring, just until sugar caramelizes and nuts are coated.  Watch carefully as it can move from carmelization to burned quickly.  If it smokes, turn down the heat and take off the burner for a few seconds.

Pour out onto aluminum foil. The nonstick aluminum foil works best.  Once they cool, break into bite size pieces.  Store in closed container or sealed plastic bags.  Good any time!

--Larue

Sunday, October 9, 2011

More Dinner with Friends: Halibut Ceviche

And....the last dish from our fabulous dinner with friends last weekend:

HALIBUT CEVICHE
Halibut Ceviche....great with tortilla chips!
Ceviche has to be one of the simplest healthiest fish dishes to “cook”.  It is low-carb, low fat, high in protein, filled with healthy stuff, kosher, dairy & egg-free. What’s not to love? And it is easy to make – just takes the best freshest fish you can find.  I like halibut – but snapper or bass would work as well.  I think it is best to start this early in the morning on the day you plan serve it.  But, you could also make it the day before.  It will keep for 2-3 days in the refrigerator.

First step is to “cook” the fish in lime juice. In a large glass bowl, combine 1 lb. "sashimi" quality fish (halibut, snapper or bass), cut into ½” cubes with 1 medium white Vidalia onion, chopped into ¼” pieces and 2 C freshly squeezed lime juice.  HINT:  It is much easier to cut the fish fillet into these pieces if it is very firm and cold.  I usually pop it into the freezer for 5-10 min – you do not want to freeze it but it will firm the fish and make cutting it simpler.  Once in the bowl, the fish should “swim” freely in the lime juice.  Cover and refrigerate until “done”, approximately 3-4 hours.  Drain and toss lime juice.

Separately, remove the seeds and stems and finely chop 2-3 serrano or 1-2 jalopeno chilies. (Be careful – use gloves and don’t touch your face until done and washed).  Add 1 lb. ripe tomatoes chopped into ¼” pieces, (or can use ¼ C soft sun-dried tomatoes, chopped finely), ½ small jicama, peeled and chopped into ¼” pieces, 1 mango cubed, 1/3 C chopped cilantro and 2 Tb olive oil (see pic). Stir in fish, taste for seasoning, season with salt (about 1 tsp.), 3 Tb orange juice or 1 tsp. sugar.  Cover and refrigerate if not serving immediately.  However, it should not be mixed with fish any greater than 3 hours in advance of serving.  If doing ahead – store fish and chopped additions separately in frig.
Mixed chilies, mango, tomato, and jicama with cilantro
Just before serving, dice 2 avocadoes and carefully add to mixture, being careful to not squash pieces. Garnish with fresh sprigs of cilantro.

I love to serve this with good quality corn chips – yellow or blue.  The combinations makes a lovely presentation and the sweet flavor of the corn chips compliments the spicy citrusy flavors of the ceviche. Yummmm!

--Larue

Wednesday, October 5, 2011

More from Dinner with Friends: Parmesan-thyme crackers

Here is another recipe from our wonderful Dinner with Friends night last weekend.  The Parmesan-Thyme Crackers were served as an appetizer with champagne. The dough was actually made several weeks in advance and stored in my freezer.  I often keep several "logs" on hand for just such an occasion - when I am busy and focused on other more immediate needs of a meal.  I just pulled them out of the freezer the night before - presto - fabulousness!!  Enjoy.

PARMESAN-THYME CRACKERS 
Parmesan-Thyme crackers....excellent with fig or peach jam!
This makes a great savory appetizer.  I usually serve it with a sweet jam – often fig or homemade peach jam.  Additionally, it can be made way in advance and frozen as a log for months. Just pull it out for that last minute guest.  Hint: I love it with champagne – but it can be addicting…as can champagne!
In the bowl of an electric mixer, cream ¼ lb. (1 stick) of good quality butter at room temperature for 1 minute.  With mixer on low speed, add 1 C (about 4 oz.) freshly grated good quality Parmesan cheese, 1 1/4 C all purpose flour, 1 tsp. minced fresh thyme leaves, ½ tsp. kosher salt and ½ tsp. grated black pepper and combine until mixture forms large crumbles, about 1 minute. If dough looks too dry, add 1 tsp. water. (Depends on the “moisture” of your cheese and quality of your butter) You will need to work it quite a bit to get it to pull together (like shortbread)...if still crumbly, add an additional 1 Tb melted butter or up to 3 TB water, but add one at a time and work it in before adding the next.

Put dough onto a floured board or counter, press into a ball and roll into a 9” log.  Wrap in plastic and refrigerate for at least 30 minutes or up to 4 days.  (Or freeze for longer)

When ready to serve: Preheat oven to 350 degrees F.  Cut the log into 3/8” thick rounds with a sharp knife and place them on a parchment lined sheet pan.  Bake for 22 minutes, until very lightly browned.  Rotate pan once during baking.  Cool and serve at room temperature.  I love the savory, buttery, nutty flavor – with a touch of sweetness from your favorite jam.  Easy, peasy!!!!!

Next post will be Halibut Ceviche!
--Larue

Sunday, October 2, 2011

2 courses from dinner: Corn soup and tomato terrine

What a fabulous night!  It is always wonderful to slow down, relax and spend time with good friends.  Sharing a homemade meal over a bottle (or two…or three!) of fine wines – even better. Since much of this meal could be done well in advance – I was able to join the lively table conversation.  My goal was to stretch out the availability of seasonal corn & tomatoes a bit longer, meet Pat’s request for short ribs and not spend the evening in the kitchen.  (Admittedly I did spend a good deal of time in the kitchen the day before!)

THE MENU (all homemade)
Halibut Ceviche with Tortilla chips
Parmesan-Thyme Crackers with variety of jams

Chilled Corn Soup with Toasted Almonds

Tomato Terrine

Cabernet Braised Short Ribs
Sour Cream-Horseradish Mashed Potatoes
Broccolini with Burrata Cheese
Roasted Fresh Lima Beans

Lemon Tart with Strawberries

Today, I will share the recipes and methods for making the Corn Soup and the Tomato Terrine.  These are BOTH very healthy and low-cal – but absolutely require best quality fresh ingredients. Hence, they are quite seasonal…get out there and make them soon.  You will not be disappointed.  They are both vegetarian. A few more dishes later in the week!

CHILLED CORN SOUP
Chilled corn soup with toasted almonds
Slice the corn off 6-8 ears of corn.  This is most easily done by placing ear on a Bundt pan while slicing so kernels fall into the pan and not all over your kitchen.  (See previous post). Put cobs in a large pot with 6-8 C water. (just to submerge the cobs)  Bring water to a boil, reduce heat and simmer for 30 min.  This will become your broth!


In another pan, melt 3 Tb butter, add 1 large Vidalia onion chopped and 2-chopped med. Shallots.  Sweat for about 10 min to soften but do not brown. Add the corn kernels, toss in mixture to coat for 1-2 minutes.  Add reserved corn broth and simmer for 20 minutes.

With slotted spoon, transfer corn and onions to a blender with 2 – 3 C of the corn cob broth. Puree until completely smooth.

Transfer to a clean container and add 1 ½ tsp. freshly grated nutmeg. Salt and pepper to taste.  Thin with additional cooking broth if needed.  Could also add optional 1 C of heavy cream.

Chill for at least 3 hours.  Can be made the day before or frozen. Serve with garnish of roasted chopped almonds.  (Or other nut of your choice, such as walnuts)

TOMATO TERRINE
Sliced tomato terrine drizzled with olive oil
 This is a bit time consuming but is SO worth the effort! The presentation is spectacular AND it tastes amazing.  It can be made 2 days ahead.

Put 2 chopped carrots, 1 thinly sliced leek, 1 chopped celery stalk, 1 halved shallot, 1 garlic clove, 10 parsley sprigs, 10 black peppercorns, and 1 dried bay leave into a pot with 3 C water to make a vegetable broth.  Bring to a boil, reduce heat to a simmer and cook for about 20 minutes – until stock yields about 1 ½ C.  Set a fine mesh strainer over a measuring cup – strain stock and discard solids.  Cover.  Keep it hot.


Peel about 8 lbs. of tomatoes of similar size and various colors, such as with a serrated peeler (there are other ways, but this is the easiest if you have one). Set a strainer over another measuring cup. Cut each peeled tomato into 4 wedges. Cut away seeds and pulp from tomato and transfer them to strainer.  Place filleted tomatoes on paper towels to drain (see pic); sprinkle with 1-2 tsp. kosher salt. Let sit for 30 minutes or longer to extract as much water from the tomatoes as possible. Pat tomatoes with more paper towels.

Filleted tomatoes on the towel
Press on seeds and pulp to extract juice to yield ½ C tomato juice. Sprinkle 3 Tb gelatin over juice – let stand 10 minutes to soften. Add to hot stock, whisk vigorously to dissolve gelatin. Stir in ¼ C chopped chives, 2 tsp. red wine vinegar, and kosher salt to taste.

Spray one 8” x 4 ½ “ loaf pans with nonstick spray.  Line it completely and smoothly with plastic wrap – allow a 3” overhang on each side.  Pour ½ C stock into pan. Chill until set, about 40 minutes.  Arrange 1 layer of tomatoes in pan, pressing down gently, then drizzle 2 Tb stock mixture over.  Repeat layering with remaining tomatoes and stock, just like making lasagne – alternating colors, pressing down with each layer. Pour remaining stock over to fill pan if needed.  Cover terrine with overhang plastic wrap. Place on a rimmed baking sheet. Press gently.  Chill terrine until set – at least 6 hours.

Uncover terrine, invert onto a platter (see pic). Remove pan and plastic wrap.  Use a serrated knife and gently slice terrine to serve.  Drizzle with extra-virgin olive oil, sprinkle with chives and sprinkle of your favorite finishing salt. If you used lots of different tomato colors, it will look spectacular! 
Tomato terrine after inverting onto platter