Monday, March 19, 2012

Roasted Radishes with Brown Butter and Lemon

Roasted Radishes

Our wonderful daughter, Cathy, brought this recipe to my attention. She had been invited to a pot luck but her cupboard (and refrigerator) were bare. She only had radishes, a little butter and a lemon. Clever girl – went to Epicurious.com and found a recipe, which included these and only these ingredients. Who knew radishes could be so great! I made it once – was amazed – and repeated it shortly thereafter so I could add it to the blog. They are amazing!!! I have often commented that braised (as in previous asparagus post) and roasted vegetables are sublime – this is just one more. They take on a different full, rich flavor – no doubt the butter and lemon help a bit. The brief high-heat roasting softens the radishes and mellows the bite of peppery flavor. The whole recipe will take about 40 minutes to prepare with only about 10 minute of prep.
When shopping, look for radishes that are about as big around as a nickel, firm and brightly colored. Older radishes will crack and split. Leaves are the best indicator of freshness. They wilt and yellow very quickly, so choose bunches with sprightly and fresh-looking greens. Wash them thoroughly, you can gently scrub the radish but don’t peel them; flavor and nutrients reside in the skin. Radishes store best in the refrigerator after the tops have been removed.  But save those greens – for garnish as well as an addition to any salad.  They have the texture of watercress and a bit of the radish flavor.
Fresh radishes
Cut off the leafy greens, but leave a little!
 Preheat your oven to 450 degree F.  Brush a heavy-duty rimmed baking sheet with a bit of olive oil. Thoroughly wash two bunches of medium sized radishes (about 20). Cut off all but ½ inch of the green radish tops; reserve the trimmed tops and rinse well. Coarsely chop the radish tops and set aside.
Cut radishes lengthwise in half and place in a bowl. Add 1½ Tb olive oil and toss thoroughly to coat. Place radishes cut side down on the prepared baking sheet, sprinkle lightly with coarse kosher salt. Roast in pre-warmed oven until radishes are crisp-tender, stirring occasionally, about 18 minutes. Remove and season to taste with salt and pepper.
Ready for roasting
 Melt 2 Tb butter in a heavy small skillet over medium-high heat.  Add a pinch of coarse kosher salt to skillet and cook until the butter browns.  Watch carefully as it moves from brown to burnt quickly. Swirl the skillet frequently to keep the butter solids from burning. It will only take about 3 minutes. Remove skillet from the heat and stir in 1-2 tsp freshly squeezed lemon juice. Swirl again.
Transfer roasted radishes to a warmed shallow serving dish, and drizzle brown butter over the top. Sprinkle with your reserved chopped radish tops and serve. This is a great side dish to Pork or Lamb or alone!  Give it a try – really.  You do not need to wait until your refrigerator is bare.
Larue

Wednesday, March 14, 2012

Very Chocolate Brownies

Very Chocolate Brownies

This is a wonderful brownie with a rich flavor and an occasional burst of rich chocolate chunks. Light cakey versions are not for me. I love a moist, dark, luscious interior with a firm, smooth, velvety texture that your teeth glide through easily; meeting just a little resistance when one encounters a little chocolate chunk. My perfect brownie must pack in intense chocolate punch and have a deep resonant chocolate flavor. It must not be so sweet as to make your teeth ache, and it must certainly have a thin, shiny, papery crust and edges that crisp just a bit during baking, offering a contrast with the brownie’s moist center. Brownies embody so much of what I love about deserts in general  - both warm and rich chocolatey decadence, reminiscent of family, friends and comfort.

One must use a high quality chocolate for success. It is key! I love Callebaut, Scharffen Berger or Valrhona. They are all available at fine grocers. Or, use your favorite locally made favorite chocolate! To truly be over the top – serve them alongside Caramel or Vanilla Ice Cream and Caramel Sauce – just with a little whipped cream or powdered sugar, or all by themselves.

I use a 9 inch square silicone mold because it keeps the edges from overcooking; if you use a glass baking pan, butter and flour it. Preheat your oven to 350 degree F. Sift together ¾ C all-purpose flour, 1 C unsweetened alkalized cocoa powder and 1 tsp salt; set aside. Unsweetened, alkalized cocoa powder (also called Dutch-processed) is treated with an alkali to neutralize its acids. Common brands are Scharffen Berger, Droste and Guittard.
 Melt 1½ sticks of unsalted butter slowly in a small saucepan over medium heat, stirring occasionally. Put another 1½ sticks of unsalted butter, cut into 1 Tb pieces, into a bowl – pour the melted butter over the bowl of butter and stir to melt the butter. (Total of 3 sticks of butter is used – ¾ lb) The butter should look creamy, with small bits of unmelted butter, and be at room temperature.
Melted butter
In a bowl of a stand mixer fitted with a paddle, mix together 3 large eggs and 1¾ C granulated sugar on medium speed for 3 minutes, until thick and pale. Mix in ½ tsp vanilla paste or pure vanilla extract. I much prefer vanilla paste for all my baking over vanilla extract. Vanilla extract is made by infusing vanilla into some sort of alcohol, usually bourbon, which bakes off during baking leaving the vanilla flavor behind. Infusing vanilla beans into thick, sweet syrup makes vanilla bean paste. The primary difference is that the vanilla beans are scraped into the paste, so you get all those lovely little vanilla bean specks in whatever you are baking along with the vanilla flavor. 
Cocoa and flour mix
Mixing the brownies
On low speed add ¼ of dry ingredients, then about ¼ of butter, and continue alternating flour and butter until all are incorporated. Now add 6 ounces 60-64% chocolate which has been chopped into chip-sized pieces, (about 1½ C). Mix to combine. The batter can be refrigerated up to a week before baking. Spread the batter evenly in the pan. Bake for 40-45 minutes, until a cake tester poked into the center comes out with just a few moist crumbs sticking to it.  If the pick comes out wet, test again in another area as you may have simply hit a chocolate chunk.  Cool in the pan until the brownie is just a bit warmer than room temperature.
chopped chocolate
Run a knife around the edge if you are NOT using a silicone pan. Invert the brownie onto a cutting board and cut into 12 rectangles.  Dust the top with powdered sugar just before serving.  If by some miracle you have some left, the brownies can be stored in an airtight container for up to two days. Gary prefers that I zap them briefly in the microwave before serving on subsequent days so that they are once again warm and oozing chocolate goodness. Delish!

Larue
Adapted from Thomas Keller recipe

Wednesday, March 7, 2012

Polenta

Crispy Polenta


Pasta and pizza always seem to be the cornerstones of what makes Italian food “Italian”. However, there is a staple food of Northern Italy that makes up the third aspect of the Italian food trinity: humble, yet versatile and satisfying polenta. A key to its popularity is its sheer versatility. It can be served with nearly anything. Soft polenta is often a replacement for bread or in lieu of a pasta course, served with butter and cheese and often shaved truffles. It is also served as a side dish to regional meat dishes such as Osso Bucco, braised short ribs or fish. Polenta can be served in a cake form – crispy on the outside, creamy within, or it can be grilled and served with Bruschetta-like toppings like mushrooms and tomatoes.

I make polenta two ways: creamy and crisp. This recipe will highlight both. For creamy polenta, I finish it almost like whipped potatoes – once it’s cooked, I whip butter and cream into it. It should be served shortly after preparing it. If your family or guests are not interested joining you in the kitchen as you finish the creamy polenta, my favorite approach is to serve it crisp as it can be done hours ahead and sautéed just before serving. I simply spread the creamy polenta in a baking sheet and chill until it sets up, then cut it into shapes, (use your imagination!), and sauté until golden brown.

My strong preference is to use extra-fine polenta by Moretti. Use whatever you like, but avoid quick-cooking polenta. Combine 6 C chicken or vegetable stock, 2 Tb minced fresh garlic and a sprinkling of kosher salt in a large saucepan and bring to a boil. Pour in 1 lb, (500 grams; 2¾ C) extra-fine polenta in a stream and cook over low heat, stirring often, for about 18 - 20 minutes, until the polenta is quite dry and coats the bottom of the pan. The moisture must evaporate, because it will be replaced with fat; otherwise the texture could be gummy. The best polenta has fat to varying degrees. If watching your fat intake, eat a smaller portion but don’t skimp on the amount as it makes the dish.
Dry polenta
 Gently warm 2½ C heavy cream in another pan. Increase the heat under your polenta to medium and stir in 12 Tb (1½ sticks – 6 ounces) unsalted butter, and cut into ½ inch pieces. Stir the polenta thoroughly. Add the warmed cream about ½ C at a time, letting the polenta absorb it each time before adding more. Season to taste with salt and pepper.
Adding the butter
For creamy polenta, pour into a bowl and top with a drizzle of finishing olive oil. Serve immediately. To be truly authentic, you should pour onto a long wood plank on your table.

For crisp polenta – featured in these pictures – pour into a baking dish that has been rinsed briefly in water and left damp. It should result in the polenta being at least 1 inch thick. Cover with a plastic wrap pressed directly against the polenta. Refrigerate for several hours until the polenta has set. Cut the polenta into rectangles or other shapes.  Use your favorite cookie cutters that will result in a deep enough cut. Heat some canola oil in a nonstick frying pan over medium heat. Add the polenta and cook, turning once, until a rich golden brown and crispy on both sides and hot throughout, about 12 minutes. Sprinkle optional chopped chives on top and serve.
Polenta in the pan
 Both versions of polenta can take similar garnishes, such as a rich tomato sauce, fried oregano sprigs or sage leaves, parmesan cheese, mushrooms, shaved truffles, chopped cooked pancetta or many others. Let your imagination run wild here. Everything goes with polenta – hence its versatility. 

Buon appetito!

Larue

Tuesday, February 28, 2012

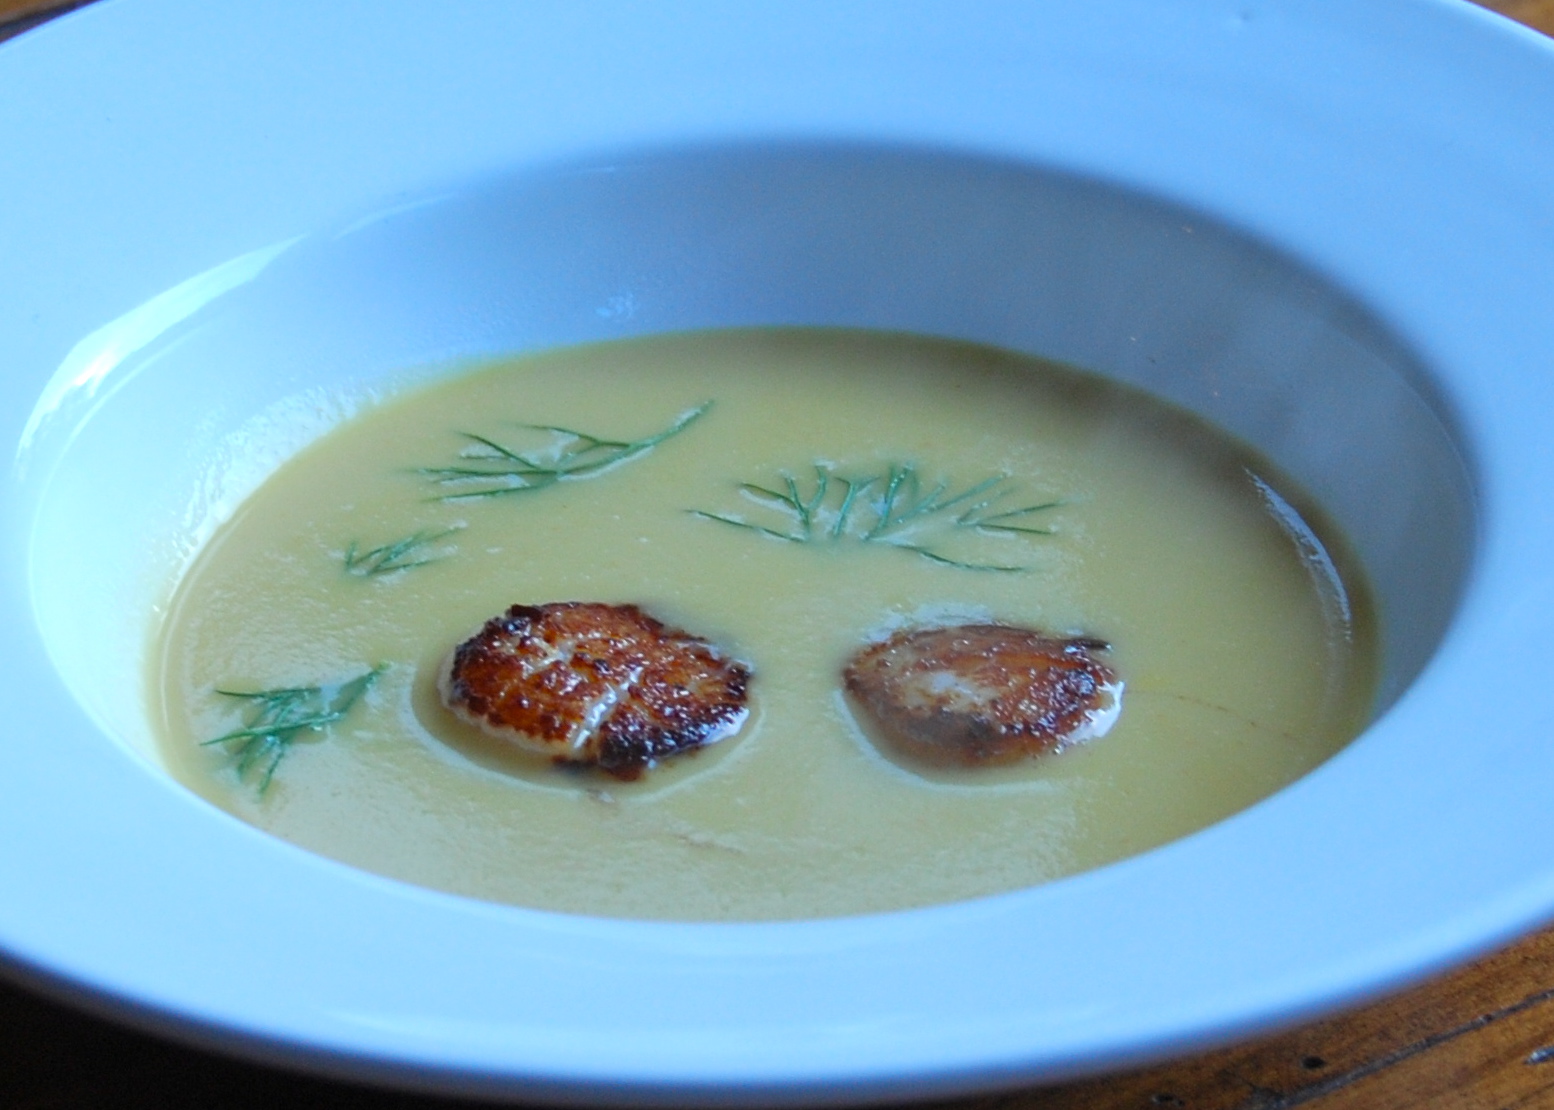
Roasted Fennel Soup with Sea Scallops

Roasted Fennel Soup with Sea Scallops

Fennel is one under appreciated vegetable.  To be honest, I am not crazy about it raw but I love, love, love it roasted. It is a versatile vegetable playing an important role in Mediterranean cuisines, especially France and Italy. Its unique aromatic taste is reminiscent of licorice and anise, especially in the raw state.  Once cooked, it becomes very sweet. It is often called sweet anise in the marketplace.

Good quality fennel will have bulbs that are clean, firm and solid, without signs of splitting, bruising or spotting.  The bulbs should be whitish or pale green in color.  The stalks should be relatively straight and closely superimposed around the bulb and should not splay out to the sides too much. Both the stalks and the leaves should be green in color.
Fennel
 Cut the green tops from 3-4 large fennel and reserve. If the bulb is discolored or tough, discard the outer layer.  Set the bulb on its flat bottom, topside up then split the white bulb in half and slice into ¼ inch thick slices. In a large soup pot, heat ¼ C olive oil; add 1 medium diced onion and the sliced fennel. Stir occasionally and roast until the fennel until it becomes brown on the edges.
Cutting the fennel
Sauteed fennel with tasty brown bits - keep them = great flavor
Sprinkle 2 Tb all-purpose flour and mix. Add 3 C chicken or vegetable stock and bring to a boil. Scrape up and include all the tasty brown bits on the bottom of the pot. They add tremendous flavor. Then add another 2 C chicken or vegetable stock and 1 C fresh orange juice. Boil the soup 10 minutes.  Add 1/3 C cream. Puree the soup in a blender, season with salt, cayenne pepper and add an optional splash of Pernod.

Now for the scallops! Rinse 12-18 large scallops in cold water. Scallops have an adductor muscle on the side. It’s a tough little tab of meat that you should pull off before cooking the scallop because it can be chewy. Dry and season with salt. Heat a nonstick sauté pan over a high heat, and add 2Tb olive oil. The oil needs to be very hot before adding the scallops.  Place the scallops flat-side down in the hot pan. Don’t overcrowd the pan, or you will lower the pan temperature, causing the scallops to be steamed rather than seared. A very important tip: once you have placed the scallops in the pan, do not touch them! If you give in to temptation to move the scallops around the pan, all you will be doing is preventing them from forming the nice brown crust that you want. Be patient! Flip the scallops after about 2 minutes.
The scallop muscle...and my husband's hand!
Because of variation in scallop thickness and pan temperature, it is not easy to pinpoint an exact cooking time. You want to see a nice, caramel colored crust on the underside. Flip over and cook for another minute but do not overcook.  Be careful here as overcooked scallops can be quite rubbery.  When removed from the pan, their centers should be slightly translucent because they will continue to cook after removal. They should still be quite springy if you press them with your thumb.  If they are very firm or stiff, they’re already overcooked.

To serve the soup, chop a few reserved fennel top fronds and add to soup.  Bring soup to a boil, and serve with 2-3 cooked scallops in the center (serves 6)

Give this soup a try – I guarantee you will not be disappointed! The best wine pairing would likely be a Sauvignon Blanc.  Other white wines would be a Viognier or a buttery Chardonnay.  Pinot Noir would be the best red wine.  Bon Appetit!

Larue

Thursday, February 23, 2012

Crostini with Mushrooms, Prosciutto & Blue Cheese


Crostini with Mushrooms, Prosciutto & Blue Cheese
This is one terrific appetizer. It can be made earlier in the day and assembled and roasted before serving. To prepare fresh mushrooms, first trim off the bottoms of the stems, and then wipe them off.  Do not rinse them or soak them because they will absorb water and turn mushy when you cook them. Crimini mushrooms are marketed under many names, including Baby Bella, Italian or Brown mushrooms. They are similar in size to white mushrooms but are a light cocoa color and have a firmer texture. They are much more flavorful than white mushrooms, having a richer, earthy taste. Portobello mushrooms are actually large crimini mushrooms. In its fresh form, the shitake mushroom has a rich, buttery, meaty flavor quite unlike the flavors of other mushroom varieties. The shitake's texture is also different from other mushrooms. A fresh shitake is approximately 75% water; considerably lower water content than that of of cousins. Less water accounts for shitakes firm-even chewy-texture and intense flavor. If you cannot locate fresh shitakes mushrooms for this recipe, use of crimini mushrooms would work as a substitute.
Crimini mushrooms
Shitaki mushrooms
Melt 3 Tb butter in a heavy large skillet over medium-high heat.  Add ½ lb fresh shitake mushrooms, stemmed and caps chopped and 4 oz chopped crimini mushrooms. Sauté until they are cooked through and brown, about 10 minutes. Just before it is finished, add 2 minced garlic cloves. Add ½ C cream and boil until the liquid is completely absorbed, about 2 minutes. Remove from heat. Add ½ C crumbled bleu cheese (about 2 oz) and stir until cheese melts. Mix in ½ C chopped thinly sliced prosciutto (about 2½ oz). Season to taste with salt and pepper.
Chopped mushroom
Sauteed mushrooms
Transfer the mushroom topping to a bowl.  It can be made 1 day ahead of time. Cover and refrigerate.

Preheat the oven to 375 degree F. Cut about 18 ½ inch thick diagonal slices from 1 sourdough baguette. Arrange the slices on a baking sheet. Bake until just golden, about 5 minutes.  Mound 1 generous tablespoon mushroom topping on each slice. Return to the oven; bake until topping is heating through, about 6 minutes.  Sprinkle with chopped parsley before serving.

Larue